Switching On:
1. Switch on the sockets for PCs and compressor (1) and microscope extension cords (2).
2a. If you plan to use the widefield microscope (regular Axio Observer 7) continue with (3A).
2b. Alternatively, if you plan to use Aurox spinning disk, switch on Aurox extension cord instead (3B).
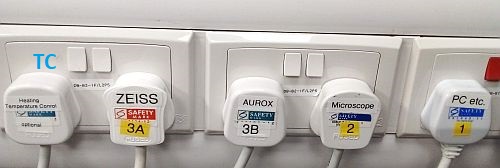
3. Optionally (if you plan to use it) switch on the extension cord for heating unit and temperature control (TC). Check if the sockets on the extension cord are on (the extension cord is located on the left-hand side of the optical table support).
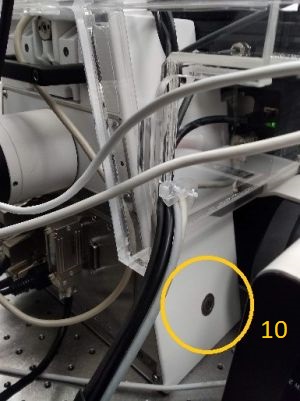
4. Switch on the microscope stand (4).
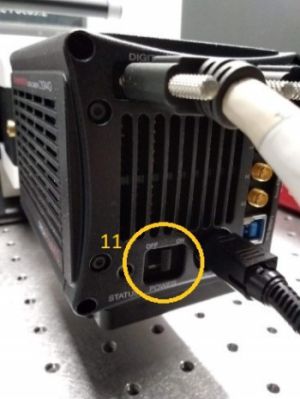
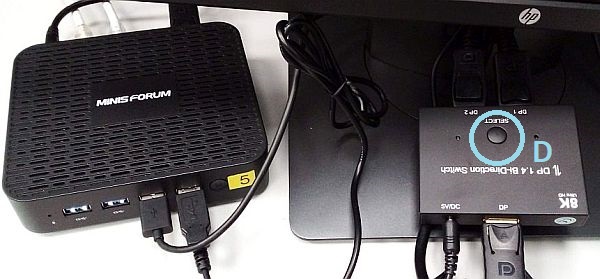
5. Switch on the mini PC (5) and Zeiss PC (6). Log in with your PPMS account on the mini PC and log in as Zeiss User on the Zeiss PC. Use the display port switch (D) to toggle between the mini PC and Zeiss PC connecting to the monitor.
6. Start ZEN Blue or Visionary (Aurox) software. Before starting the software, check that the appropriate camera is switched on (C). ZEN uses the right-hand side camera, Aurox the left-hand side one. Note that if both cameras are on, ZEN will face issues with camera settings.
7. When starting ZEN Blue, select ZEN Pro.
You will be prompted to start microscope stage calibration.
Attention: before starting the stage calibration make
sure the stage is empty and objective is lowered
down to avoid the risk of a mechanical collision.
Switching Off:
1. Make sure you have saved your data and turn off ZEN or Visionary software.
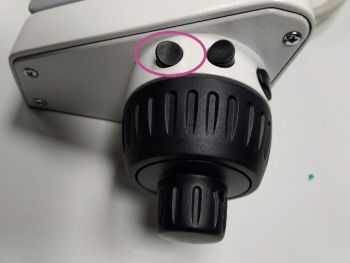
2. Move the stage to the Load position (by pressing the lower button next to the focusing knob or by pressing the button at the touchscreen panel) and remove your sample.
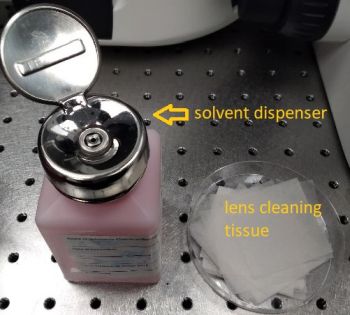
3. If you have used an immersion objective, wipe it clean. Use the lens cleaning tissue. For cleaning oil immersion, moisten the tissue at the solvent dispenser. Always wipe the objective only once, in one direction. If this is not sufficient, repeat with a new piece of tissue. Never reuse the tissue.
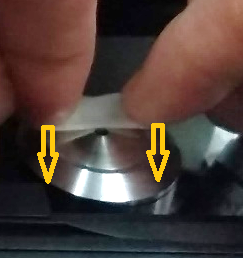
4. Switch off the sockets you have switched on during the switching on procedure.
5. Use the mini PC to transfer your data to OMERO or shared network drive.
6. Shut down the computers. Switch off the mini PC first!
7. Make sure you leave the microscope room clean. Spray with 70% ethanol and wipe any surfaces that could have been in contact with biological material. Do not leave any samples or any other belongings behind.
Axio Observer 7 Imaging:
Transmitted light imaging:
A simple transmitted light imaging experiment can be set up in the Locate tab. In general, the Locate tab allows you to set any simple imaging experiment; however, for more complex automated acquisition modes such as multi-channel or multi-position imaging, we need to go to the Acquisition tab as we will discuss later.
There are two panels in the Locate tab: Light Path and Camera. Let us look at the Light Path first. The panel displays a diagram of microscope parts in a topology corresponding to their physical locations (what is on top in the diagram is on top in reality).
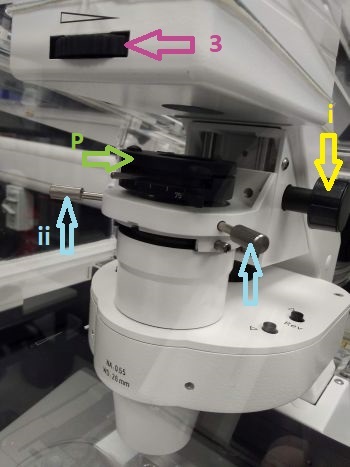
The transmitted light arm is almost fully controlled by the software and consists of a lamp (1), shutter (2), field-stop (3, not included in the diagram, since that is the only manual component in the path, see the image below) and condenser (4). Clicking at the arrow in the lower right-hand side corner of the respective box opens a dialogue with settings. The shutter (2) is an exception as it is only toggled between two states (open/closed) by clicking the box.
The voltage of the lamp (1) can be set - it changes the intensity of the output light.
The field stop (3) defines the illuminated area, this is used when setting Koehler illumination.
The condenser (4) settings dialogue contains selection of the mode of contrast (brightfield, phase contrast or DIC). Phase contrast requires specialised objectives, check the system overview to find which objectives support phase contrast. Alternatively this information can be found from objective details displayed at the touchscreen panel. For phase contrast, the objective needs to be matched with the correct phase ring (Ph1, Ph2 or Ph3).
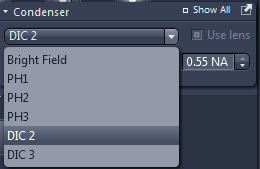
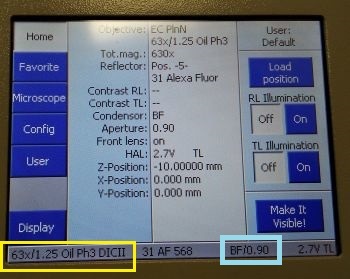
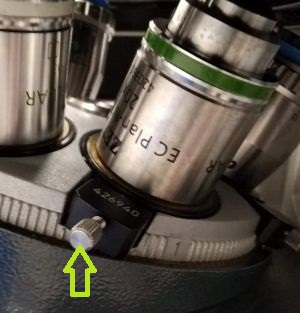
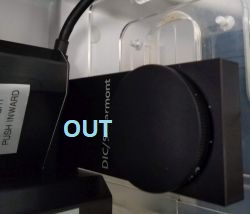
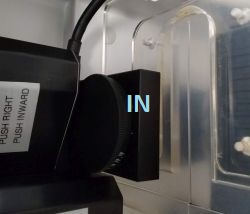
For DIC, the objective has to be matched with the correct prism in the condenser (see the details at the touchscreen panel) and a few more manual components are involved as described in the following box:
| Setting up DIC: |
|
The numerical aperture of the condenser can be also set here. This influences the intensity of the light at sample as well as the contrast and resolution of the images. For brightfield the rule of thumb is: Condenser NA = (0.6 to 0.8) Objective NA. For phase contrast, the highest available condenser NA is usually selected.
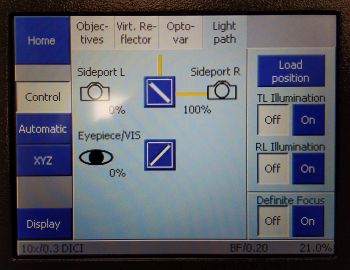
The current condenser contrast mode/NA is also displayed at the touchscreen panel (status bar at the bottom, brightfield (BF)/NA = 0.9 in the example).
Other components are common for the transmitted light and fluorescence paths; they are the objective revolver (5), the beamsplitter (6), the emission filter (7), the tube lens (8) and the intermediate phototube (9).
For transmitted light we need neither a filter nor beamsplitter, so we select empty positions for both.
The tube lens turret (8) has three positions: 1x magnification, 1.6x magnification and 2.5x magnification; the overall image magnification is Tube-lens magnification x Objective magnification).
The intermediate phototube (9) selects whether the light will go to the eyepiece or to the camera. The right-hand camera port is used for widefield imaging (Axio Observer 7). You can also control this from the touchscreen panel:
Next we'll have a look at the Camera panel. The only parameter here to set is the exposure time. For brightfield it can be usually quite short (order of ms usually); for phase contrast and darkfield, longer exposure and/or higher lamp voltage are typically needed. The exposure time can be optimised automatically by pressing Set Exposure. See notes on optimising image intensity.
Note: If Auto Exposure option is checked, the exposure time will be automatically optimised for each image frame captured which may result in varying exposure times within a series of images.
This is all for the settings. If we have loaded a sample, we can view it in the eyepieces or on the screen using live camera image - Live (11) or Continuous (12), and focus the sample by turning the focusing knob (located on the sides of the microscope body as well as on the side of the touchscreen panel). Once the sample is in focus, we can take static images by pressing Snap (13). See notes on adjusting the display of images in ZEN.
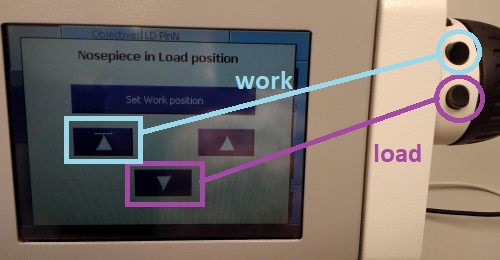
We can toggle the objective position between the Load position and the last Working position (position at which images were taken) by pressing the buttons next to the focusing knob or on the touchscreen panel.
| Koehler illumination: |
|
Fluorescence imaging:
Locate tab can be used for simple fluorescence imaging; however, for more complex automated acquisition modes such as multi-channel or multi-position imaging, we need to go to the Acquisition tab as we will discuss later.
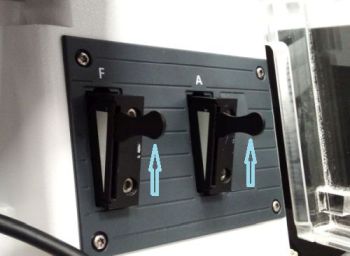
Let's start again with the Light Path panel. The fluorescence illumination arm is mostly motorised. The only manual parts are the field and aperture stops. Make sure they are fully open (lever in the uppermost position) for consistency.
The motorised part consists of the epifluorescence lamp (1), shutters (2) and the excitation filter (3). Other components are common for the transmitted light and fluorescence paths; they include the beamsplitter (4) and the emission filter (5); setting of the rest of the components such as the objective or the tube lens is in no way different from setting up transmitted light imaging.
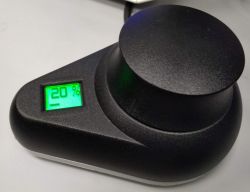
The output of the epifluorescence lamp (1) can be controlled in the software or by a dedicated control knob. The actual excitation intensity for different percentage of the lamp power can be found in this table.
The excitation filter (3) selects the excitation wavelength suitable for the fluorophore of interest.
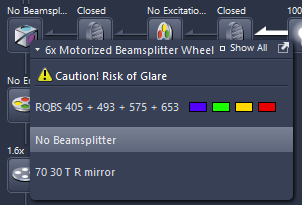
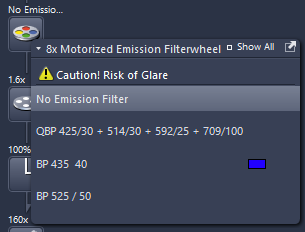
The beamsplitter (4) and the emission filter (5) offer both a quad-band (QB) option, which is suitable for any fluorophore that can be imaged with this setup. Other beamsplitters and filters can be selected in the respective dropdown menus. Note, the 70/30 splitter is for reflected light imaging, not for fluorescence.
Next we'll need to set the camera exposure time in the Camera panel. For fluorescence it is usually on the order of 100 ms. This is all for the settings and we can view the live image by pressing Live or Continuous or take static images by pressing Snap. The exposure time can be optimised automatically by pressing Set Exposure. See notes on optimising image intensity.
Note: Never check Auto Exposure if you want to compare fluorescence intensity between images. For comparing intensities it is critical to acquire the images with identical settings, including identical exposure times. Auto Exposure can also result in impractically long exposure times when the imaged part of the sample exhibits no or extremely low fluorescence (e.g. when acquiring a Tile-scan including regions lacking fluorescent structures).
Note: If you've set a long exposure time, it will not be reflected in Live mode since it's intended for purposes such as focusing or stage movement where a fast refresh rate of the live image is desirable.
Multi-channel imaging:
For more complex imaging scenarios, we need to move to the Acquisition tab, where we can set up acquisition of multi-channel images, Z-stacks, multi-position images, or time-lapse acquisition (and, of course, arbitrary combinations of those).
Note: the lastly used multi-channel setting may be loaded automatically. To setup your own setting from the beginning, create a new setting in Experiment Manager.
To set up a multi-channel acquisition, add channels by pressing the dedicated button in Channels panel. A window with a selection of fluorescent dyes will pop up, where you can select and add dyes identical or close to those in your sample. Different transmitted light contrast modes can be added as well.
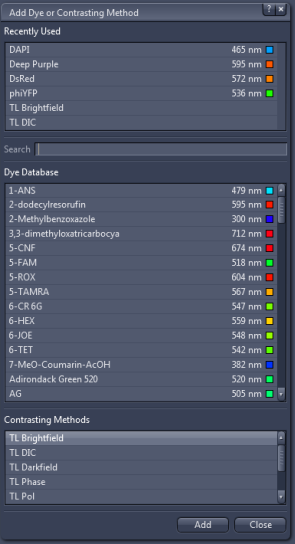
Note that the selection is vastly redundant, since the number of actual settings for fluorescence is limited by the number of excitation filters. The program thus matches each fluorophore with the best match from the available excitation filters.
Let us for example select a green fluorophore such as EGFP and Brightfield. The Channels panel can than look something like this:
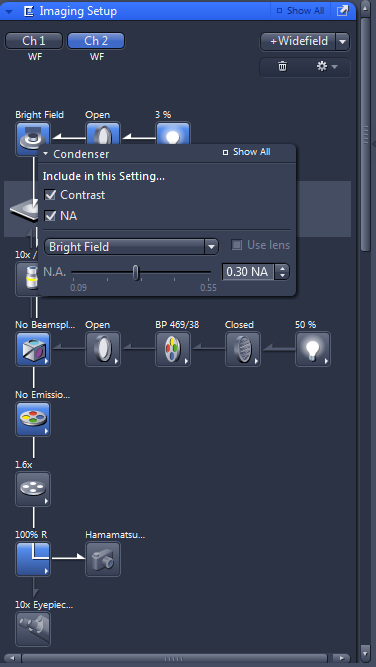
Left click on a channel selects the channel. In the example shown, EGFP is selected. The selected channel will be displayed in live mode by pressing Live. You can set the exposure time for the selected channel (each channel can have different exposure, see here for notes on setting the exposure) as well as the intensity of the Lightsource. The Lightsource dropdown menu contains 3 options: Transmitted light LED, Epifluorescence lamp (XCite) and Use Settings; the last option automatically selects the lightsource according to the imaging modality (fluorescence or transmitted light) but doesn't allow setting the intensity.
You can also modify the Light Path for each channel. Most settings are determined by the selections of the imaging modality (transmitted light or fluorescence) and for fluorescence channels by the selection of the fluorophore and should be loaded according to the modality and fluorophore selected.
A component which it potentially makes sense to set here is the condenser for transmitted light channels. The difference from lightpath setting in Locate tab is the presence of check boxes for each setting which allow you to select whether the settings will be a part of the channel settings. In the example shown, both NA and Contrast mode are checked. That means for example that the current NA (0.3) will be a part of the channel settings. If I want to acquire two different transmitted light channels, I can set different condenser NA for each channel (e.g. for phase contrast I would use the maximum NA of the condenser). If this box is unchecked for all channels, they will be imaged with the same condenser NA whatever its value is at the start of the image acquisition.
Components the settings of which are a part of the channel settings are displayed in blue, components which are not a part of the channel settings are diplayed in gray. When you add channels using Add-channel dialogue, the software should take care that all relevant components settings change correctly when switching between channels (such as transmitted light vs. epifluorescence lamp shutters and optical filters). In case you observe issues (e.g. transmitted ligt contributing to the fluorescence channels or all fluorescence channels excited by the same wavelength), which may happen under some circumstances, revisited the channels' settings to make sure all relevant components (shutters, filter wheels) are blue.
Important: To achieve the highest possible
imaging speed, you may, on the other hand, want to make sure
all components that don't need to change between
channels are gray (e.g. for multiple fluorescence
channels only the excitation filter wheel needs to switch, the
multi-band dichroic and emission filter are the same for all).
You may have also noticed "Ref." in the EGFP channel line, it stands for Focus Reference and is related to an option to correct for objective chromatic aberration as explained in the following box:
| Chromatic aberration compensation: |
|
By pressing Snap, we take an image with all selected channels (those that are checked in the Channels panel - checkbox is to the left of the channel name). The image can be displayed as an overlay of all channels (2D) or as a split view.
There are two panels below the image display. Let's look at the left-hand side one:
The control in the panel allow us to zoom in and out and select which channels are displayed (only the two fluorescence channels are displayed in the example, brightfield display is switched off). The Graphics tab (currently hidden) allows to add objects such as a scale bar to the image.
The right-hand side panel shows the image histogram discussed in the following box:
| Image histogram: |
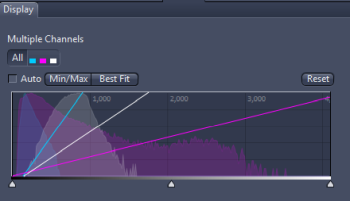
|
Z-stack acquisition:
To acquire a stack of images at different Z-planes check Z-stack option (at the upper part of the left-hand side container):
Z-stack panel will be added to the settings panels in the left-hand side container. To define a stack, focus to the lowest plane you want to acquire and press: Set First. Then focus to the uppermost plane and press Set Last. The number of slices in the stack is determined by the range and the interval between slices. Interval that satisfies Nyquist sampling for the axial resolution of the selected objective is suggested as Optimal (4.08 μm in the example shown).
Alternatively, Z-stack can be set up by selecting the central plane and the range (centre +/- half of the range). Go to the Center tab instead of the First/Last tab in the Z-stack panel. Focus to the central plane, confirm it as the centre of the stack by pressing Center and define the range and interval between slices. Use this option when working with autofocus; the autofocus will maintain the selected focal plane as the central plane of the stack.
Once the stack is set, start the acquisition by pressing Start Experiment. The stack will be recorded for all channels checked in the Channels panel.
Z-stack can be then viewed by individual planes, as orthogonal sections or as 3D rendering (see the tabs to the left of the displayed image).
Multi-position imaging:
The motorised stage can be used to set a few types of multi-position imaging experiments:
- Tiles scan - acquire an image larger than the field of view of the camera by stitching together multiple images acquired at neighbouring positions.
- Positions - remembers a list of selected stage positions, which can be then imaged repeatedly. This makes sense mainly in combination with time-lapse imaging, when it allows to monitor in time multiple locations within the sample.
- Sample-carrier-specific position grids - for standard sample carriers such as a 96-well plates allows setting up easily acquisition at a regular positions grid (e.g. each well of the plate).
You can also watch these this ZEISS video tutorial on basic multi-dimensional acquisition or these video tutorials on more advanced settings such as autofocus, support points, Z-stacks and sample carriers (external links, free-of-charge registration required).
Check the Tiles option in experiment settings area in the left-hand side container and a Tiles panel will be added:
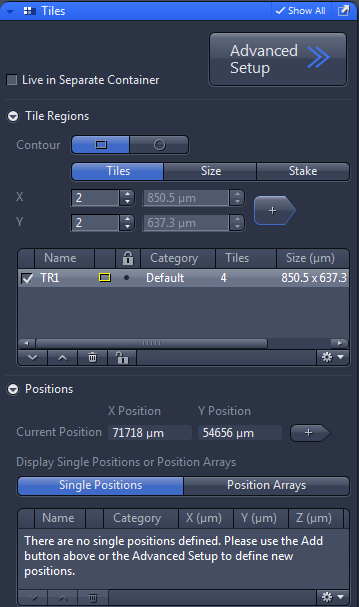
The upper part of the panel allows defining the Tile scan
- in the example shown the scan will cover a field of 2x2 fields of
view, by pressing the  button it is added to the list of Tile
scan regions (multiple regions can be defined and then all of them
imaged).
If you are imaging a single large object (e.g. a tissue section) and want to make sure that you capture the whole object, select Stake option. You will then move the stage to several positions at the boundaries of the object and store those positions (called Markers in this context). The program will then set the tiles regions in such a way that it contains all the stored positions. Important: Because of the orientation at which the camera is mounted, the images need to be rotated by 90 deg counter-clockwise for the tiles to connect correctly. This can be set in the Acquisition Mode panel:
Acquisition at a set of discreet positions can be set in the lower part
of the Tiles panel. Move the stage to the desired position and press  .
The position will be stored in the list of positions. Repeat this step
for all other positions to populate a list of arbitrary positions.
Another option is to select a Sample carrier from the
list (e.g. 96-well plate). Then press Calibrate... and
you will be prompted to move the stage to selected reference wells.
Based on those reference positions, the program will calculate the grid
of positions of all wells in the plate allowing setting up an automated
acquisition in all (or selected) wells of the plate.
Panorama:
This is a tool for creating overview images of large areas of the sample and for navigating the motorised stage through the sample. Check the Panorama option in the experiment settings part of the left-hand side container and start Panorama mode by pressing pressing Start Experiment. In Panorama mode, the image window represents an overview of a larger sample area accessible by the motorised stage and within this window the current camera field of view is displayed as a region of interest. Dragging the region of interest to a new location will move the stage to the corresponding location and a preview of the camera field of view at that location will be displayed. In this way the sample can be mapped and regions of interest selected for further imaging.
Time-lapse imaging:
Setting up a time-lapse acquisition is very straightforward. Check the Time series option in the experiment settings part of the left-hand side container and a Time Series panel will be added. You can set the number of time points to be acquired (10 in the example) and the interval between them (0 s in the example). For the fastest possible acquisition (for a single channel limited by the camera exposure and readout time only) check Use Camera Streaming option. Start acquisition for all selected channels by pressing Start Experiment.
Using hardware autofocus:
The microscope is equipped with Definite Focus.2 hardware autofocus based on reflection of infrared light from an optical interface (typically the interface between the cover glass and the sample). It helps to compensate for temporal drift of focus during time-lapse imaging. Its current status is shown in the right-hand side container of ZEN window.
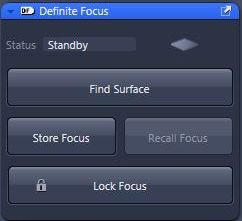
The microscope can automatically search for the interface (Find Surface) by which it helps you to focus your sample. After focusing on the interface you can adjust the focus (by the focusing knob) to bring the structures of interest (typically located some small distance above the interface) to focus. You can then store the focus position (Store Focus) or lock it (Lock focus), in which case the microscope will maintain the currently focused plane in focus.
When doing a (multi-position) time-lapse, you can set up autofocus to refocus at every time point or every position. Go to the Focus Strategy panel in the left-hand side container and select Definite Focus from the drop-down menu.
Saving images:
Acquired images are listed in the image explorer panel at the right-hand side of ZEN window. For each image the name, size, thumbnail and icons indicating image type are shown. In this example we see a multi-channel image (C), a multi-channel Z-stack and a multi-channel Tile-scan. Image (selected by double-clicking on it) can be saved by clicking the floppy-disk button (highlighted for the benefit of younger users not familiar with the early history of data storage).
This is not very convenient for saving large numbers of images. If you want to acquire many images, it is useful to set up Auto save option in a dedicated panel in the settings area on the left-hand side. Check the Auto Save option in the experiment settings area of the left-hand side container and go to the Auto Save panel to set the path for saving images.
Select a folder for your images at the data drive (D:). ZEN will automatically create a sub-folder there named according to the current date. Set a base name for your images - all images will then have the name with a number differentiating individual images.
Note: The images you see open in ZEN (in the image explorer panel) are not the ones that are saved to disk by auto save. Any changes to the images after acquisition (e.g. adding scale bars) do not modify the auto saved images and the modified images need to be re-saved.
Note: Auto Save applies only to images acquired under the Acquisition tab. Images Acquired in the Locate tab by pressing Snap, are not saved automatically.
When closing ZEN, a window will appear with the list of modified files asking whether they should be saved. Do not be disturbed if all images appear there as unsaved when you are using auto save - that does not mean that the auto save is not working (see the note above). Besides images, the list also contains all Experiment Manager files that have been opened during the session. You can uncheck all and not save any changes if you have saved all your images (e.g. by Auto Save). Note that saving any images in this way saves them to a default image location rather than letting you choose the destination.
Saving imaging settings:
Acquisition settings can be saved for future use in Experiment
Manager (open a drop-down menu by pressing  and select Save As and
give the settings a name by which you can later recognise the file;
ideally include your name to make it clear whose settings those are). In
the example settings file called Experiment7 is open; other settings
files can be chosen from a drop-down list.
The settings are also stored in the image metadata and settings used to acquire an image can be recalled by the Reuse button when the image is open.
Note: neither experiment manager nor the image metadata collect information about manually controlled components. Make sure you note those down to be able to reproduce your experiments.
Aurox Clarity imaging:
Coming soon...
